
VR using Photon Multiplayer Module
This tutorial will help get those users who wish to use the Photon Multiplayer Module for VR, up and running. It is not the most elegant of solutions and for this we will not apologise, the Photon Module is not our product. However, we have done our best to make it easy, simple, and fast to get a solution coded that actually works. We have needed to work around the constraints of the Photon Module, but at least it provides all the functions that we have tested. As we have our own Multiplayer solution, OpenWorld, we will not be doing anything further with this multiplayer option.
Much of what we did to set this up is required by the Photon Module and is detailed in their documentation, so we will assume that you can cover that by your self. However, we will state the main points and document what we did.
1. For this project, we use Unity 2020.3 LTS, Game Creator 1 version 1.1.16, Photon Module 0.3.6 enabling Examples, PUN2 Version 2.41, and our very own VR Module version 1.4.1 that includes the VFR Photon example scene.
2. To get Photon working you will need an account and to generate an app id. This is all in the Photon Module Documentation and we will not be covering this. For this example, we used the sample scene GameIO - Zone 1 from the Photon Module sample scene, but there is no reason why it would not work for the other examples.
3. To proceed any further, you need to install ALL of the above, insert you app id in to the sample scene, and ensure it is all working on the desktop. Again, we do not support this asset, so you need to ensure that it is all working correctly before proceeding with you VR implementation. Those are our disclaimers, so let move on.

Once you have your multiplayer scene working, and please test it with multiple players, we have added the XRRig and the XR Manager from the VR Module Prefabs folder. You can do this if you are working from the sample scene, or you can just use our example. I suggest that you do it yourself, and keep our example as a reference.
The Rig and Manager should be both disabled as they will conflict with the existing components. We have also added a new Camera Motor (Adventure Camera) and also disabled this. The Photon Module uses the Follow Camera and you will get errors if the Adventure camera motor is not disabled.
At each of these steps, you should also retest to make sure that you have not broken anything. Now would be one of those times.
To simplify things, we also deleted the Player variants from the Network Prefabs, but this should really matter.
The next thing you need to do, is create on key down trigger, to swap from Desktop Mode, to VR Mode. We set this up on the F1 key, as many of the normal keys have been used by Photon. Under this Trigger, we created the follow Actions.
- Set inactive the existing Main Camera
- Set Active the Adventure Camera Motor
- and Set Active the XRRig.
These are all GC Core Actions and if you do them wrong, you will get conflicts and errors.
- Change XR to Active (dragging in the XRRig and Manager
- Change Character Movement to Left Thumbstick
- and Add the BasicIK Solver (you can also use the Final IK solver but we have not tested that).

This is another good time to test. Start your game either by building a Windows version or running it in the Editor. Sign on, press Play, and once you see your Player Character, place you VR Headset on (tethered via cable or air link) and press F1.
You are now in the scene and can walk around using the Left Thumbstick. Other players will also see you walk around, but although you can see you arms waving, they cannot. This is a limitation with the solution that we stated earlier.
NOTE: If all you want is too walk around and use the built-in chat system, this is all you need. You can distribute the game as is, and those who want VR can press F1, those who want to use Desktop, don't.
To proceed from here, and use Actions, Triggers and Conditions, you will need to modify the configuration. You will need to do this for both VR and for Desktop, if you wish to distribute only one copy of your game.
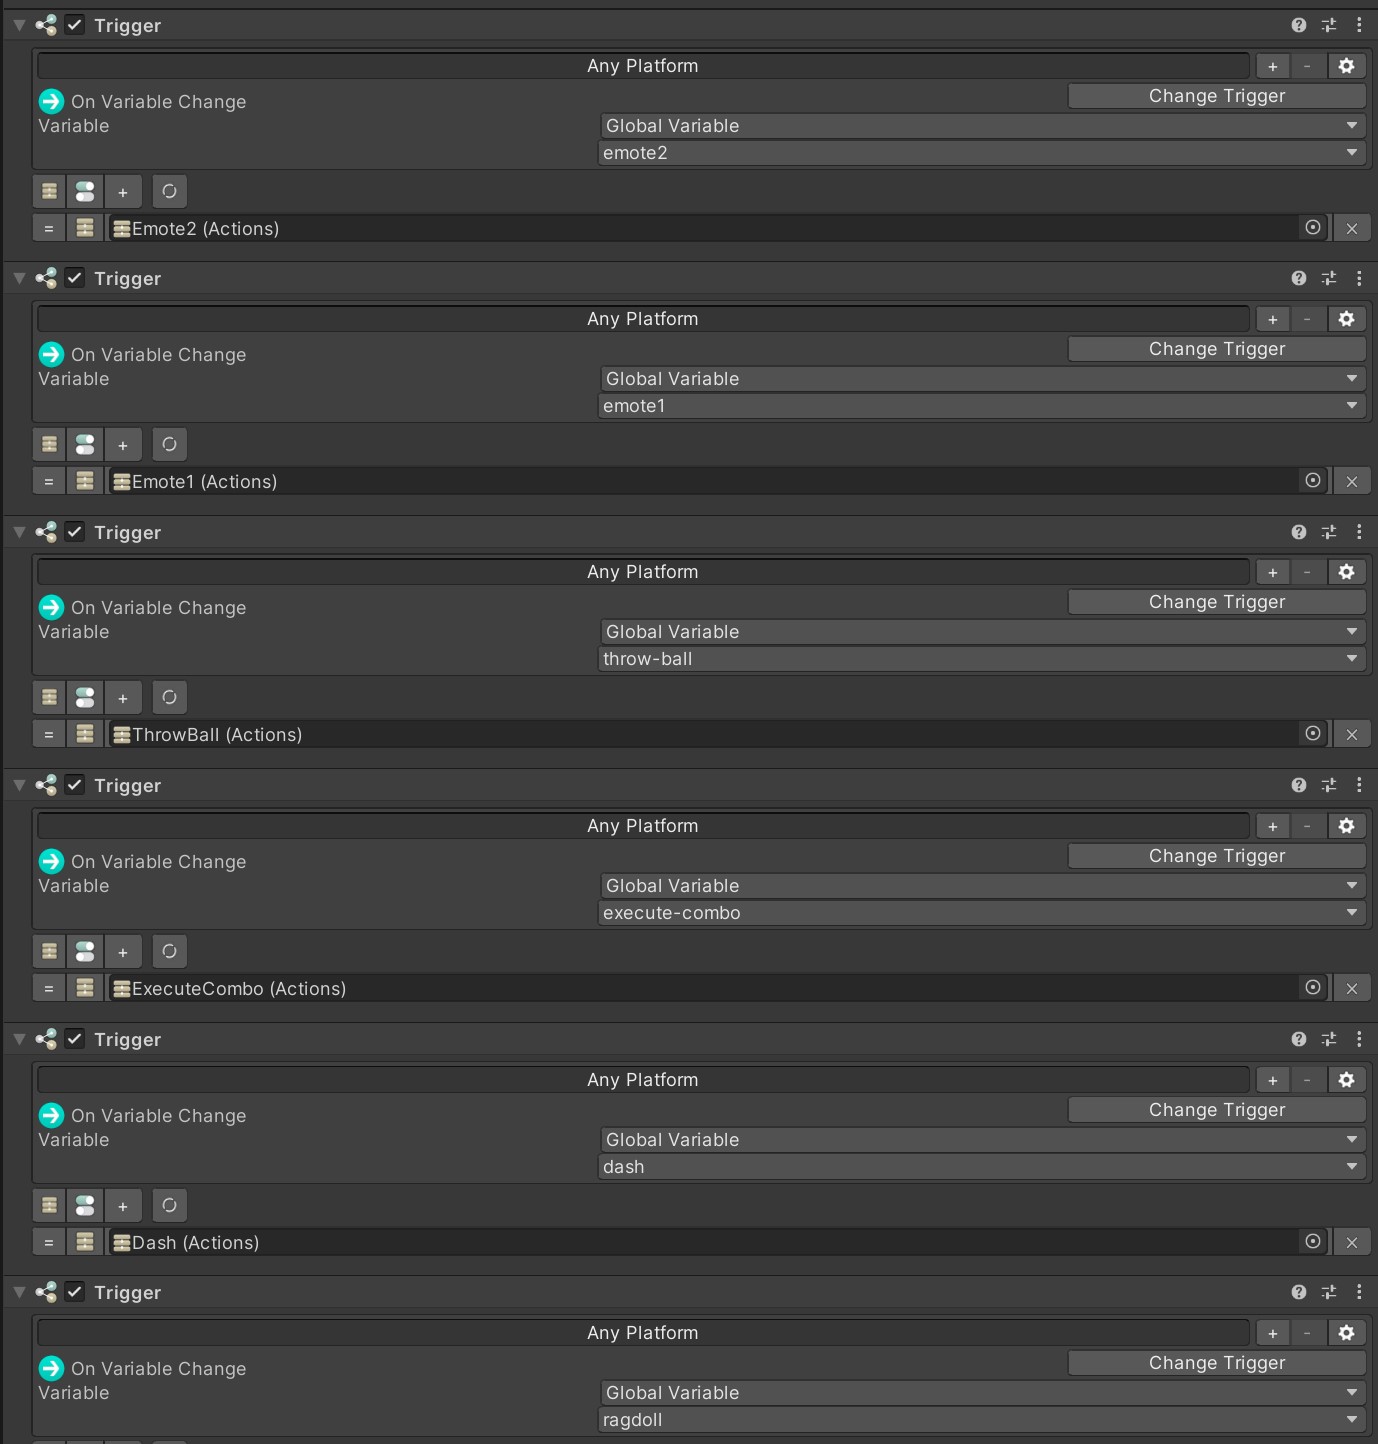
Breaking from normal convention, the Triggers and Actions have been added to the Character Prefabs. Therefore, to be able to use them and add them to the VR Hand controls, you must change all the Triggers in the Prefab. We looked at using code for this, but the simplest way is to use the features that come with GC1. We used on Variable change and Change Variable.
First, you need to locate the Character Prefab and double click on it to open the Prefab.

The one we are interested in is the PlayerInputTrigger, as it has the Triggers that link to the Actions and Conditions that have been configured for this scene. You can see that there are 6 Triggers that execute 6 Actions.

For this to work for VR, and for both VR and Desktop, the easiest way is to create six GC Global Bool Variables and name them accordingly. You can use the same system for other Actions that you wish to propagate through the network, but we are just building an example of how to do this and hence we are using the existing Actions.
NOTE: Any new Actions you create will need the Network Sync Actions added. See the Photon Docs for more on this.

Now back to the Character Prefab, and change all the Triggers to on Variable Change, and point to the corresponding Variable.
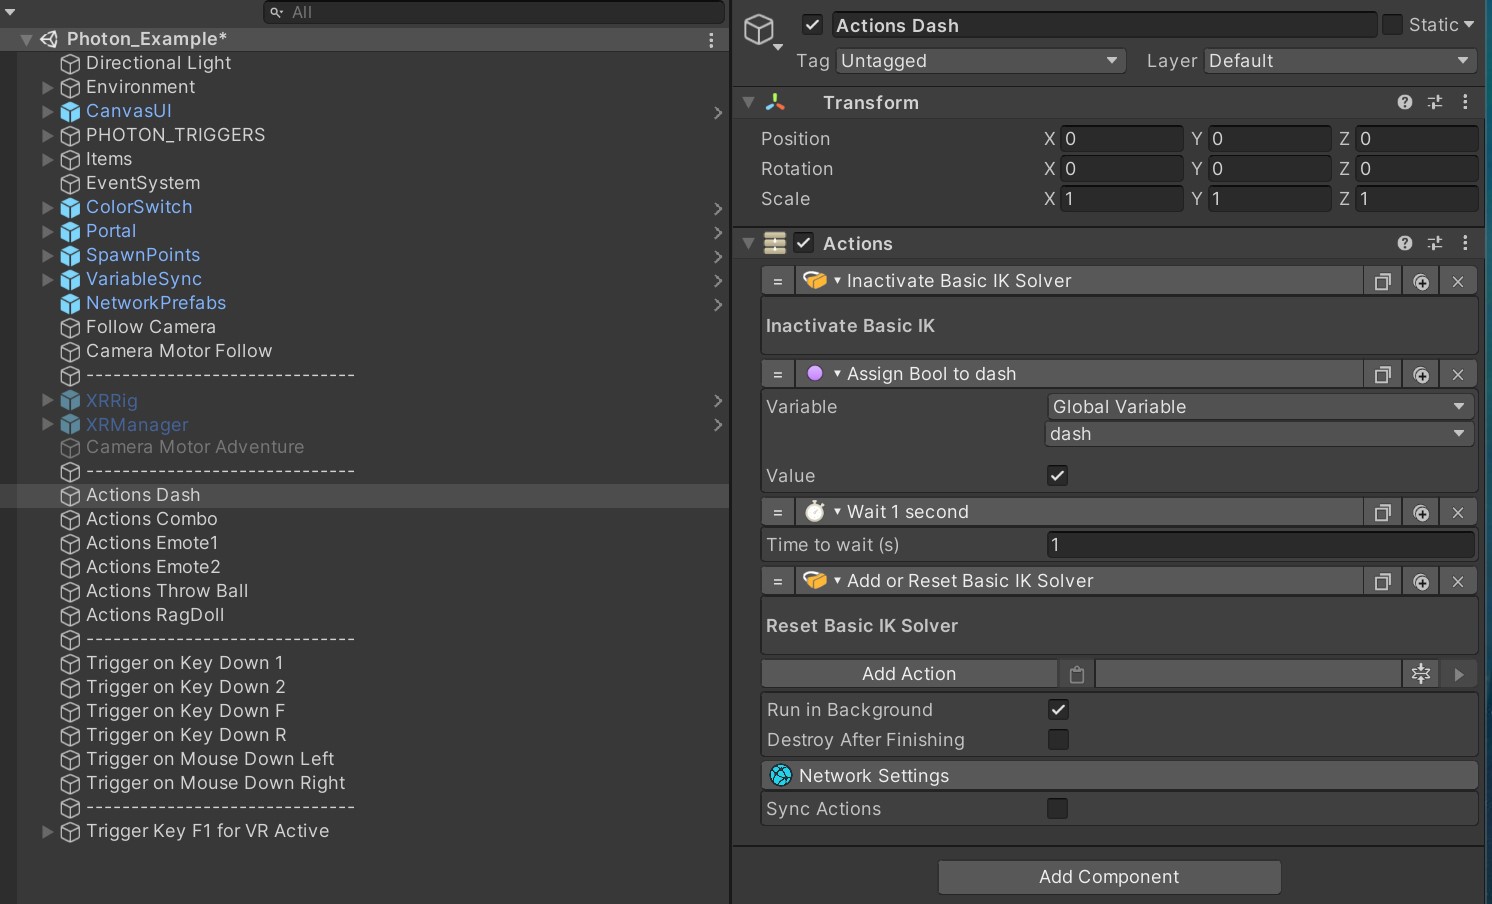
Next we need to add a set of Actions that will change each of the created Variables. I have named them the same as the Actions. Once this is done, you can add each Action to which ever control you wish on your XR Manager Hand Follower.

So that you can distribute your game to be played either on Desktop or tethered VR Headset, you need to duplicate the Triggers from the original Prefab, and set these to also change the associated Variables by dragging in the correct Actions that you just created.

And finally, and this is because the VR system is always tracking your hand controllers, you need to tell it not to in each of the Actions that you created. You need to add the inactivate for which ever IK system you are using, then change the Variable, Wait an appropriate amount of time depending on which Action it is, and then reactivate the IK. This will enable the Animations to play, and it will have no effect on the Desktop Triggers. They will still work just fine without errors.
Build and Run, and all should work as designed. Just remember, you will see you arm movements, others will not. To other players, you will look exactly like you are playing on the Desktop.
Enjoy and Check out OpenWorld, the Ultimate Multiplayer System.
Useful Links
Pivec Labs |
||
|
||
|
||
|
||

|
||
|
|
|
Since |
2005 |
|
Awards |
||
Website |
||
|
|
|
|
|
|

|
||
ALL RIGHTS RESERVED © 2022 |
||